
Templates
Index
eBECAS uses Microsoft Word templates for the generation of pdf documents for students, agents and accommodation providers.
Templates are customised word documents with several embedded “bookmarks” (each bookmark displays a single item text or number) and “table bookmarks” (a single bookmark placed at the top left of a table to display a grid containing columns of data).
Each bookmark references data from the eBECAS database and places the data referenced by the bookmarks in the template to produce a new Microsoft Word document.
Colleges can register any number of templates and customise and edit the Microsoft Word templates with your branding and styling for re-use multiple times, without re-typing. This provides significant efficiencies and a common look and feel.
Microsoft Word documents generated from templates can be attached to emails and sent from within eBECAS and carbon copies sent and can be kept for reference.
Templates can be generated with student details including fees both nett and gross for agents and can include homestay details and airport transfer details.
Templates can be generated individually (for single student using a standard template) or in bulk for multiple selected students (using a template with AutoText area defined). Please see here for details about sending documents to multiple students using Autotext.
Where are the eBECAS templates located?
Multiple College staff members will likely need access to the same templates, all templates are stored in the supplied Document Repository for your College. The templates can be downloaded and uploaded after editing and accessed via the internet whether you are in the office or elsewhere.
How do I create an eBECAS template?
A new template can be created from within Microsoft Word or an existing template can be copied and modified. Make sure you place the created template in the folder you have already specified. A template can only have the extension .dot or .dotx, if it has a file name other than this, it is not a template.
Hint: A template can only be opened after initially opening Microsoft Word, do not simply click on the template from Windows Explorer without first opening Microsoft Word, or the template will be converted into a document. Look at the top line in blue, it should show the file name and end in .dot or .dotx Only a file name ending in .dot or .dotx is a template

Registering a template in eBECAS
After a template has been created you must register the template name and the area in the menu you want to access and use the template.
eBECAS provides many areas in the application that templates can be used. The registration of the template specifies where in eBECAS menu the template will be available and also what group of data you want to display in the template.
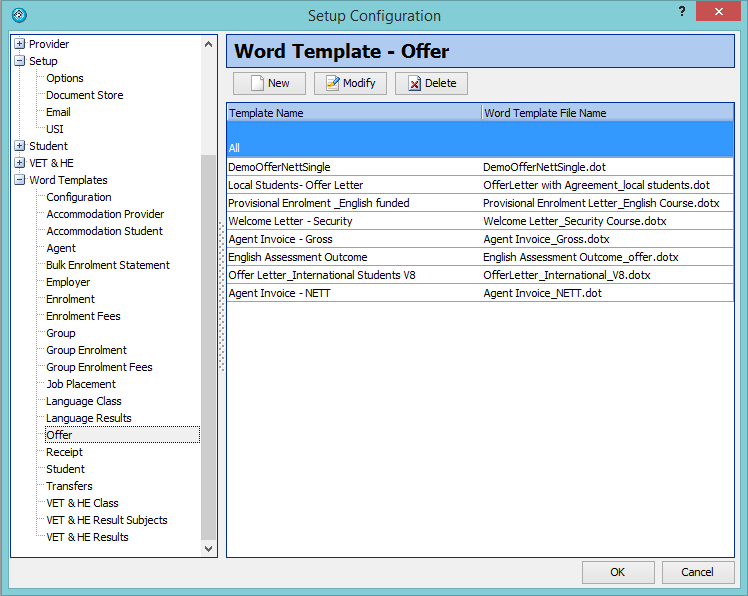
In the above screen, you will see that you can register templates within eBECAS under Student, Enrolment, Enrolment fees, Receipt, Academic Results, Language Results, Accommodation Student, Accommodation Provider, Transfers, Group, Group Quote, Agent, Bulk Enrolment Statement and Offer. These locations refer to different menu options available in eBECAS.
If I register a templates in the Offer area, then Offer details screen shows:
By selecting Print – Word Merge – the choice of registered templates under Offers is displayed:
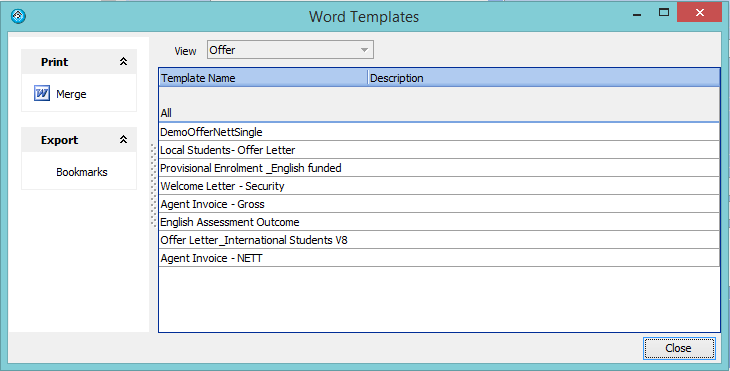
Selecting the relevant template name and pressing the merge button will generate a document from the template. The bookmarks in this template will be filled in with the Offer details.
Note: When emailing a document, it is best not to send the Microsoft Word document as an attachment but convert the document to a PDF and then attach it to the email. This ensures the document attached to the email cannot be changed.
While you are able to register any template under any menu option, the information and bookmarks available change depending on the part of eBECAS you are in. This is an important concept. The location the template is registered in determines what data you want to display in eBECAS.
For example: A student can have many offers and many enrolments (accepted offers for courses). It is only by going to the Offer, and selecting the offer does eBECAS know what offer out of potentially many for the student, you want printed.
This is also true for printing homestay placements (a student can have many homestay placements), a student can have many Airport transfers. It is important to register the templates where the details can be found for the bookmarks used.
What are the available bookmarks?
Every Template Merge option has a corresponding Export option, which lists all the bookmark names and what data will be output for the bookmark. We do not provide a complete document that lists all the bookmarks that are available in each area on this website. As the bookmarks change depending on where the template is registered, we have provided you with the facility to display the bookmarks and the actual data that will be returned when the bookmarks are used, on the screen from your workstation.
To display all the available bookmarks for Offers, go to the Offer detail screen 1.61, press Print – Word Merge – and the registered templates will be displayed. Now press Export – Bookmarks, a new screen will appear asking you to save a file with the bookmarks, simply press the Save button, and then you can open the file and see the bookmarks and data for each bookmark.
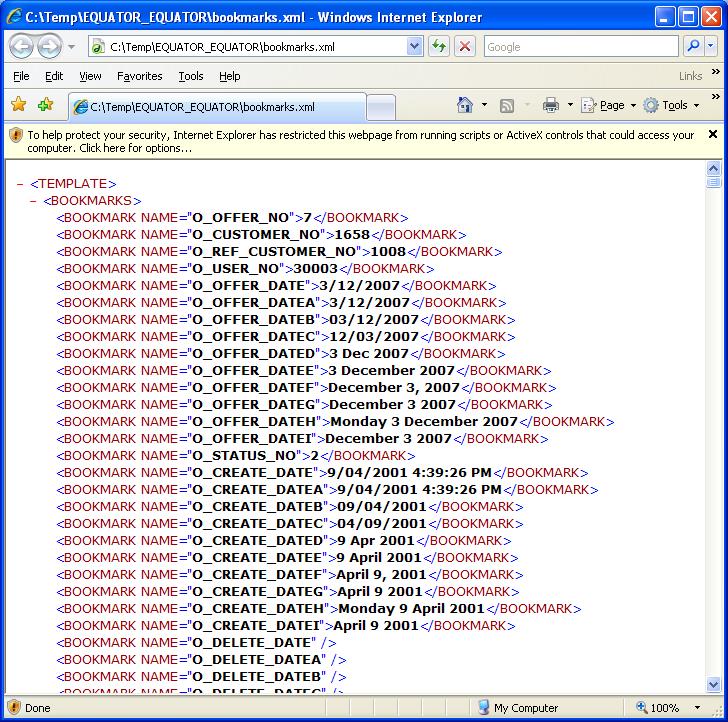
At first this looks confusing, but the bookmarks follow a very simple naming convention that is easy to read and understand. All the bookmark names are displayed on the left, and the bookmark returned values for the particular Offer, are displayed on the right. For example:
![]()
In the file I have extracted one simple bookmark, the image above shows that the bookmark name is O_OFFER_DATEE. If that bookmark is used in your Offer template, the value displayed will be 3 December 2007
Note: There can many many situations where you want to use the same bookmark. Microsoft, in their wisdom, do not allow a bookmark name in a template to be used more than once. We have therefore provided duplicates of the same bookmark. For example, you may want to use the Student’s first name several times in the template, we provide several different bookmark names displaying the same data, for example: S_FNAME, S_FNAME_1, S_FNAME_2, S_FNAME_3 and S_FNAME4 all display the student first name.
Table Bookmarks
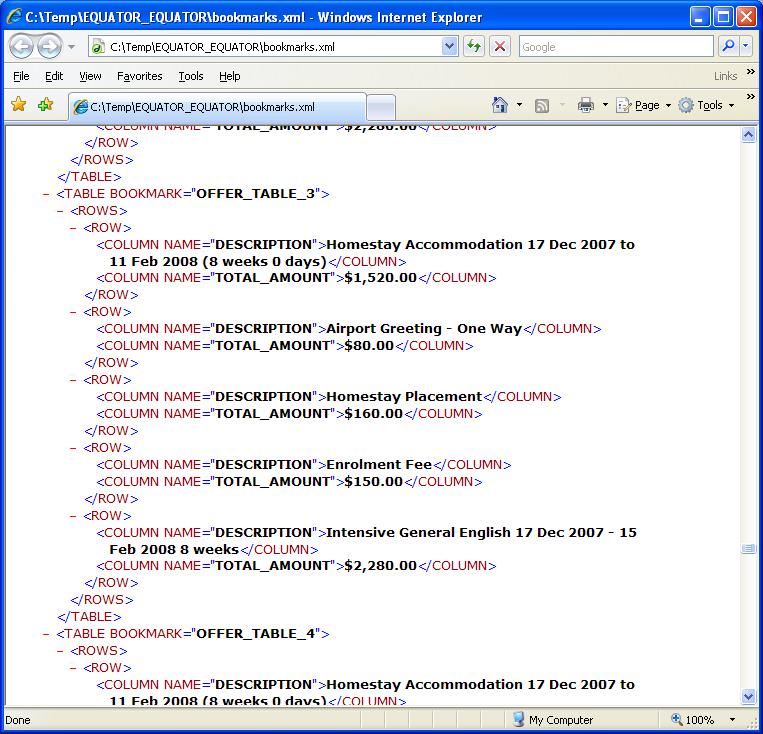
A table bookmark is a grid, where columns and rows of data are displayed. For example the table bookmark OFFER_TABLE_1 is one of the available offer Table Bookmarks
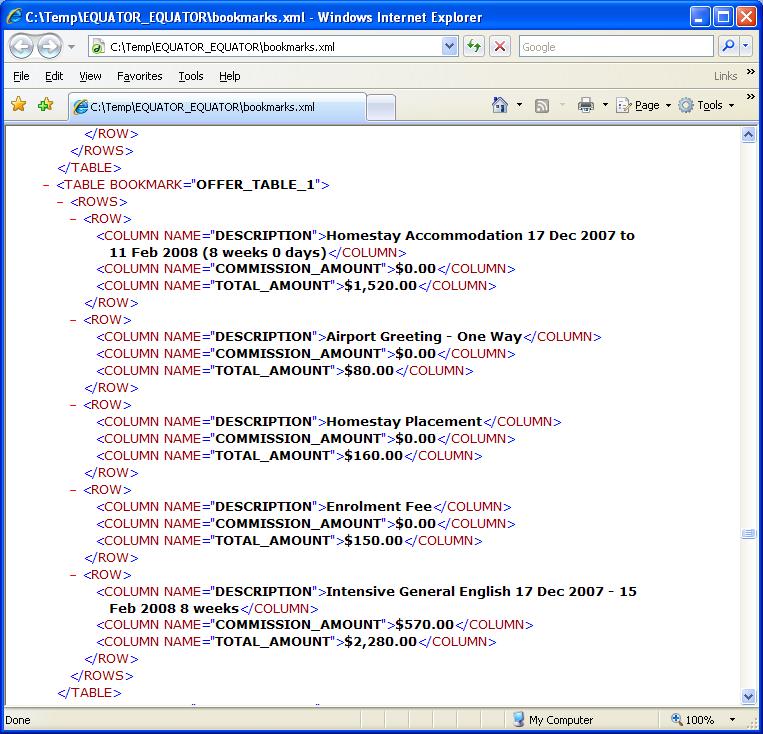
To interpret what the table bookmark is displaying, there are 2 columns and 5 rows, for the above table bookmark OFFER_TABLE_1, the column descriptions are: description, commission amount and total amount:
| Homestay Accommodation 17 Dec 2007 to 11 Feb 2008 (8 weeks 0 days) | $0.00 | $1,520.00 |
| Airport Greeting – One Way | $0.00 | $80.00 |
| Homestay Placement | $0.00 | $160.00 |
| Enrolment Fee | $0.00 | $150.00 |
| Intensive General English 17 Dec 2007 – 15 Feb 2008 8 weeks | $570.00 | $2,280.00 |
There are several different Table Bookmarks that can be used, displaying different combinations of data for the offer.
Using bookmarks in a template
Open a registered template, making sure that you open the template from within Microsoft Word and then go to File – Open, or File – New – Template. It generally is easier to use the demonstration templates we supply and edit and save them as a new template name (ending in .dot or .dotx).
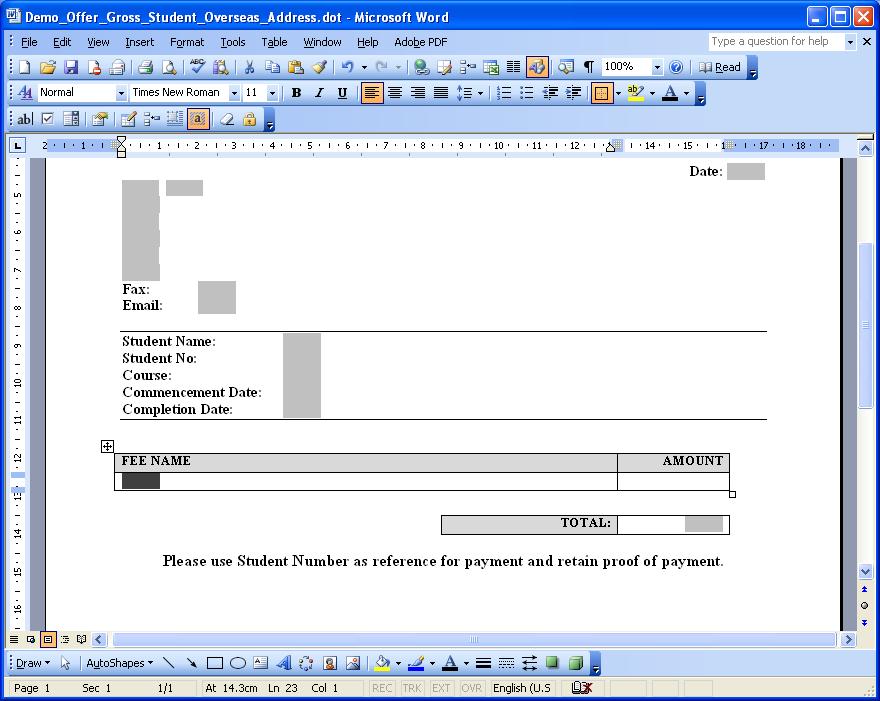
To demonstrate the use of bookmarks in a template, I will use one of the demonstration templates we supply and edit it, then add new bookmark. I am using the template named Demo_Offer_Gross_Student_Overseas_Address.dot. The template opened in Word will look like this:
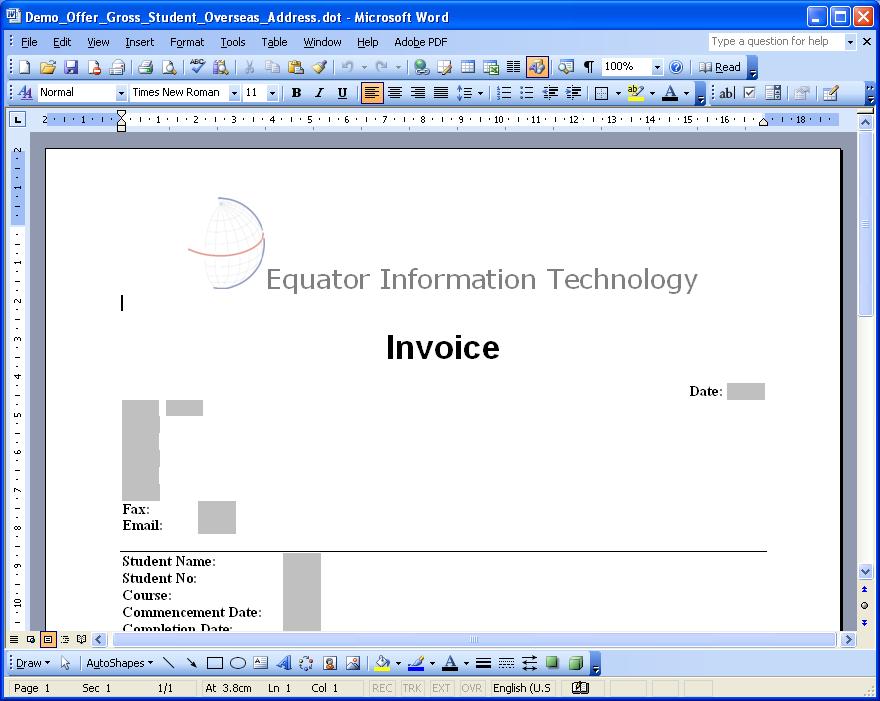
Notice that you have all the standard options within Microsoft Word. You can embed images and personalize the document. You will see grey “block” areas in the document – these are the bookmarks.
Using the right button on your mouse, move over to and right click on the grey bookmark. A list of options will be displayed, select the property option. The following screen will be displayed.
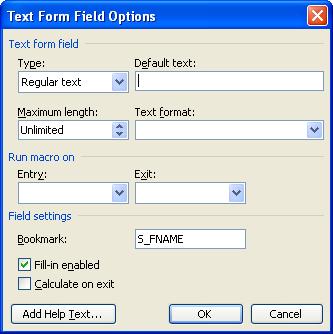
The important information in this screen is the Field settings and the Bookmark (name), which is S_FNAME
This is where you specify the name of the eBECAS bookmark you want to use, to extract and display the bookmark returned value from eBECAS.
Adding bookmarks to a template
There are 2 ways to create a new bookmark. The simplest is just cut and paste an existing bookmark. Using this method, it is important to check that you have not removed the original bookmark name, if you have pasted the new bookmark before the exiting bookmark in the document. Have you thought about why this happens? As I said earlier, using Ms Word you cannot have more than one bookmark with the same name, so if the original bookmark was in the document below where you pasted the new bookmark, the name will have been removed. From the list of bookmarks, I showed you above to how to display, right click and select the new bookmark, and enter the bookmark name.
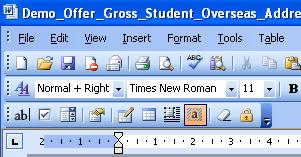
To use Microsoft Word to enter a new bookmark, without cutting and pasting, you first need to have the Form Toolbar enabled. In Microsoft Word, go to – View – Toolbars – Forms. On the image below, the bottom toolbar is the Form Toolbar.
The far left button is the Bookmark button, click on the location in the template you want the bookmark to be located, and then press the Bookmark button on the Form Toolbar, a new bookmark is entered, now just specify the bookmark name.
![]()
Adding a Table Bookmark in a template
A table bookmark enables you to display a grid. In eBECAS we support many different types of grids with different combinations of data displayed. You can enter headings for the columns and you only need to use one bookmark in the table. Be sure to look at the Table bookmark you want to use and generate the table with the correct number of columns for the table bookmark that you are using.
For example, in the template, I only want to display the offer item and the price, as I use offers to send “Invoices” to students. The price for the offer items are gross, so I don’t need or want to display the agent commission. Looking at the export from the offer area, I can see that the table bookmark OFFER_TABLE_3, has two columns.
This is the grid I want to use in the Offer for the student, so I insert a table and reference the Table Bookmark.
Open the template, click in the template where you want the table to be located, and then in Microsoft Word, click on Table – Insert – Table, you will then have the following screen displayed:
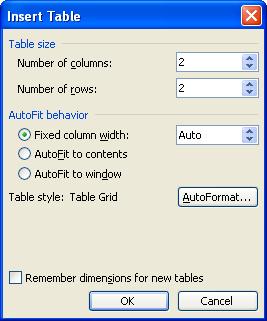
For OFFER_TABLE_3, we only need 2 columns and all tables only need 2 rows (rows will be autogenerated as required). We also only need the top row for the column headings. Enter in the column headings as you would like them to appear, and enter a new bookmark in the second row, with the bookmark name as OFFER_TABLE_3 and you should have something like this:
In this template, I have also added a single bookmark to display the total. The bookmark I used for this was O_TOTAL_AMOUNT.
Bookmarks
Student bookmarks
All student based bookmarks start with S_ for example S_CODE represents student code (student number), S_FNAME represents student first name, S_PHOTO represents student photo, S_LANGUAGE_DESC represents student language (mother tongue) and S_NOTES represents student notes etc.
Because of Microsoft design, you cannot re-use a bookmark. Therefore, we provide four additional bookmarks that contain the same information. So as an example, to display the Student Code you can use the bookmarks S_CODE, S_CODE_1, S_CODE_2, S_CODE_3 and S_CODE_4. This works the same for all bookmarks throughout eBECAS.
If there are any homestay placement requests or homestay placement information for the student, the homestay bookmarks start with a H_. For example, H_FROM_DATE is for homestay placement from date, H_TO_DATE is for homestay placement to date and H_NOTES is for homestay notes.
If there is any family homestay placement for the student, the family bookmarks start with a F_. F_CODE is for family homestay placement code, F_NAME is for family homestay placement name is for F_NOTES for family homestay notes.
If there is any Airport Transfer information for the student, the airport transfer bookmarks start with the T_. For example, T_APU_DATE for the airport pickup date and time, T_FLIGHT for the flight number, T_PU_BY for who is making the pickup, T_PU_FROM for where the pickup is from and T_PU_TO is where the student is going to.
Student financial bookmarks: Students can have many enrolments, the student financial bookmarks are a representative total of all enrolments and all fees. Fee total bookmarks include S_GROSS_TOTAL, being student gross total, which includes agent fees, S_RECEIPT_TOTAL, being student receipt total, S_CREDIT_TOTAL being student credit total and S_BALANCE being student balance (outstanding).
Student financial grid/table bookmarks: These grids display all enrolments for the student.
GRID_SNx – Student NETT separately listing agent and tuition fees in a grid
GRID_SG1 – Student GROSS listing the course cost total of tuition and agent fees in a grid
Offer bookmarks
All offer-based bookmarks start with O_, for example the bookmark O_OFFER_NO is offer number and the bookmark O_OFFER_DATE is offer date. All the student bookmarks that start with S_ are available, if the offer is for an agent all the agent bookmarks that start with A_ are available. If the student has airport transfer transfer details, all transfer details that start with T_ are available. If the student has a homestay request, all homestay details that start with H_ are available.
Offer financial bookmarks: Offers can include several courses and other offer items. Offer fee totals include O_COMMISSION_AMOUN (offer commission amount), O_DISC_AMOUNT (offer discount amount), O_TAX_AMOUNT (offer tax amount), O_SUB_AMOUNT (offer total amount less the discount, exclusive of tax), O_NETT_AMOUNT (offer total amount less commission less discount, less tax) and O_TOTAL_AMOUNT (offer total).
Offer financial grid/table bookmarks: Please use these grids to comprehensively display multiple courses, homestays and transfers. By using single bookmarks and not grids you can only display one enrolment whereas offers are designed to display multiple courses and details in a grid. The offer items text can be configured by the College to display the details. There are bookmarks and grids/tables to list offer items, totals and also to list offer instalment plans. Please do not use single bookmarks to display course offers … please use the grids ….
Enrolment and Enrolment fee bookmarks
Enrolment bookmarks include all the student bookmarks that start with S_, all the homestay bookmarks that start with H_ and also all the Airport transfer bookmarks that start with T_.
Enrolment bookmarks start with E_, there are many enrolment bookmarks.
Enrolment financial bookmarks: Students can have many enrolments, there are student financial bookmarks as well as the enrolment financial totals. Enrolment fee totals include ENROL_GROSS_TOTAL (enrolment gross total which includes agent fees), ENROL_AGENT_TOTAL (enrolment total agent fees), ENROL_NET_TOTAL (enrolment fees not including agent fees), E_GROSS_TOTAL (enrolment gross total including agent fees), E_RECEIPT_TOTAL (enrolment receipt total), E_CREDIT_TOTAL (enrolment credit total), E_BALANCE (outstanding enrolment balance).
Receipt bookmarks
To be able to print a receipt, you must be in the enrolment fees screen and first highlight the receipt. On the left Print panel, you will find an option ‘Receipt Merge’.
Receipt bookmarks include all the aforementioned student bookmarks that start with S_, all the homestay bookmarks that start with H_, all the Airport transfer bookmarks that start with T_, all the enrolment bookmarks that E_ and all the agent bookmarks that start with A_.
Receipt bookmarks start with R_.
VET and HE Result bookmarks
1. student bookmarks that start with S_
2. homestay bookmarks that start with H_
3. airport transfer all the Airport transfer bookmarks that start with T_
4. enrolment bookmarks that E_ and if the student enrolment was sent by the agent –
5. agent bookmarks that start with A_.
VET and HE Result grid/table bookmarks:
T table result bookmarks (the selected enrolment results (non VET listing marks and grades)
- Nothing appended e.g. T1 – Lists all subjects/modules.
- Appended with _1 e.g. T1_1 – Lists all modules excluding marks or result codes that are not filled in.
- Appended with _2 e.g. T1_2 – Lists all modules excluding modules that have both no marks and no result codes filled in.
- Appended with _A e.g. T1_A – Lists all modules and includes module assessment item results.
- Appended _1_A e.g. T1_1_A – Lists all modules and includes module assessment item results. Excludes modules or assessment items that have either marks or result codes that are not filled in.
- Appended _2_A e.g. T1_2_A – Lists all modules and includes module assessment item results. Excludes modules or assessment items that have both no marks and no result codes filled in.
G table of result bookmarks for the enrollment grouping of results (non VET listing marks and grades) as above for extensions
V table of result bookmarks for the VET listing of outcomes as above for extensions
TP table of Training plan listing start date and end date for module with weeks and hours
Language Result bookmarks
Language results are very flexible in layout and use. Instead of immediately reading through the list of exported bookmarks, it would be useful for your understanding to read about how the templates and bookmarks are meant to be used and referenced.
Please click/reference here to see a typical Language Results setup.
To be able to print language results, you must be in the results tab of the enrolment details. On the left Print panel, you will find an option Word Merge.
Language Results bookmarks include all the above detailed student bookmarks that start with S_. If there is a homestay placement, all the homestay bookmarks that start with H_ will be included. If there is an airport transfer, all the Airport transfer bookmarks that start with T_ will be included. All the enrolment bookmarks that E_ and all the agent bookmarks that start with A_ will also be included.
The result single bookmarks are for the highlighted / selected result.
The results bookmarks start with LR_. Below is a list of the language results bookmarks:
LR_DATE – Result date
LR_LEVEL
LR_TEACHER
LR_EFFORT
LR_ATTENDANCE
LR_GRP_NAME_1 (to 10)
LR_GRP_CODE_1 (to 10)
LR_GRP_DESC_1 (to 10)
LR_CUST_NAME_1 (to 5)
LR_CUST_DESC_1 (to 5)
Language Class grid/table bookmarks:
- LC_CLASS_x1
- GRID_RESULT – Lists all result group results. The grid is 3 columns wide, with column details: result_group_desc, result_code and result_desc
- GRID_CUSTOM – Lists all custom results. The grid is 2 columns wide, with column details: result_group_desc result group description and custom_score.
Language Result grid/table bookmarks:
Accommodation Student bookmarks
Normally Student accommodation details are printed when the student is placed in a homestay. If the student has more than one homestay placement, you need to go to the Student – Homestay details and select the placement details that you want to print.