
Index
eBECAS is CRICOS, AQTF, AVETMISS compliant. eBECAS supports government funded programs, Victorian Student Number (VSN) monthly reporting.
- Enable AVETMISS for relevant companies, faculties, courses, modules and students
- Store AVETMISS details for students that use AVETMISS directly within their student account
- Generate and submit AVETMISS returns
The purpose of this section of the manual is to provide you with assistance in setting up and using the Avetmiss features in eBECAS. eBECAS has been built with integrated reporting to the Australia Quality Training Framework (AQTF) and allows you to make submissions of Avetmiss data non government funded and government funded returns.
Setup
For a comprehensive checklist of the tasks that need to be completed to successfully set up AVETMISS for your college, please refer to our AVETMISS Setup Checklist. For older versions prior to eBECAS 9.6.x.x please refer here – AVETMISS instructions for earlier versions.
eBECAS is CRICOS, AQTF, Avetmiss reporting and HEIMS PIR returns.
Avetmiss and HEIMS Reporting are paid options that are enabled in eBECAS by Equator IT
Company Details
You will then have to navigate to eBECAS – Utilities – Company to enable Avetmiss for the company and fill in the details.
Delivery Locations
Delivery Locations define the physical locations where VET Training is to be conducted and reported under Avetmiss. There may be one single Delivery Location (such as the Head Office if training is Online) for all Faculties, or there may be multiple Delivery Locations, shared between Faculties, Programs and Subjects.
For each Delivery Location, Avetmiss Details need to be completed. The AVETMISS Code used for each Delivery Location should be unique within the Company
Faculties
For VET Faculties, a default Delivery Location for Training under that Faculty should be defined. Enrolments for Programs in this Faculty will use this Delivery Location by default.
Optionally, multiple, extra Delivery Locations can be attached to each Faculty on top of the Default Delivery Location. These Delivery Locations are then available for individual Results when each subject will be provided from a different Delivery Location to the Faculty Default.
To set-up a Faculty for VET Delivery: Check the Avetmiss Enabled check box and select the default Delivery Location for that Faculty.
Optionally, set-up additional Delivery Locations linked to the Faculty.
Click the Locations Tab to view all Delivery Locations (including the default) attached to that Faculty. Use New and Delete to modify the list of additional Delivery Locations. These will now be available as alternate Delivery Locations for Results for Enrolments in this Faculty.
Subject Details
Please go to eBECAS – Utilities – Subject and for each module fill in the details.

Program Scope
The Program Scope is used to define a full list of Training (Programs and Subjects) that the RTO provides – this will mirror the Scope of Registration for the Organisation.
Once the Scope has been setup, build different VET Training Programs using the Scope which will be ready for Enrolment and AVETMISS reporting.
The quickest way to Setup and Update the Scope is by importing a current Scope of Registration in csv format, which can be obtained from the relevant State Training Authority.
To obtain the Scope of Registration
- In Queensland: RTOs are able to access the qualifications and units that they are registered for according to the VARS system via DETConnect. Under the Training Downloads component of DETConnect, download “RTO Registrations – Qualifications/Courses (Snapshot)” and “RTO Registrations – Units of Competency/Modules (Snapshot)” as excel spreadsheets.
- For other States – check with your State Training Authority
The file will need to be converted to a csv/text if provided as an excel file. Use the Save As option in Excel and select CSV as the format.
To import into eBECAS, select Import Scope from the Program Scope Search Form.

Specify if a Header is at the top of the file (these are the column names, generally this will be true) and the Separator (generally comma). Click Import Scope File and select the file just obtained.
If this is a standard import file (such as from DETE Qld) the Column Linking should show as set-up automatically. Otherwise, select which column in the Scope file relates to a column in eBECAS. At the very least, a column for the Course Code or Subject Code must be selected.
When ready, click Process file to compare this against the current Program Scope and Subject set-up in eBECAS (depending on the size of the Scope of Registration file this may take some time).
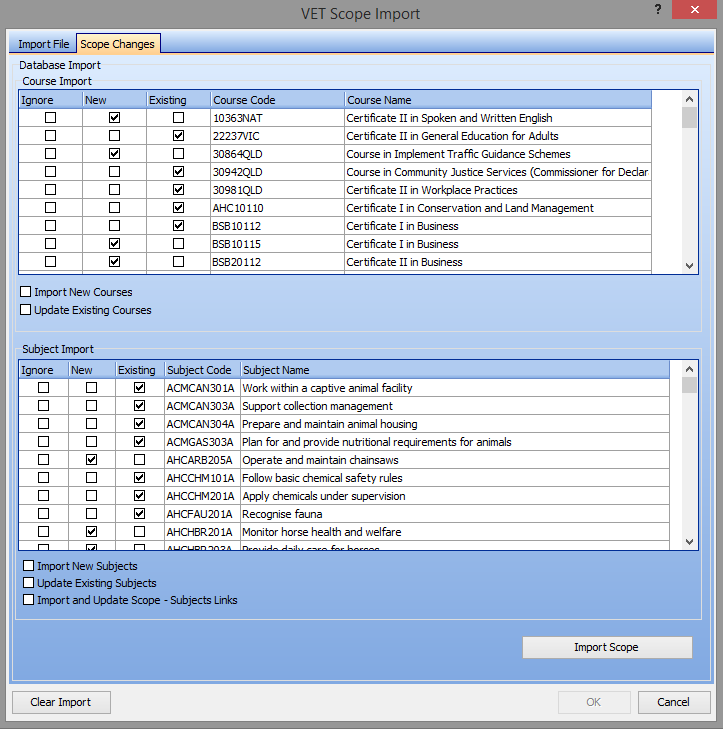
This will display all Programs and Subjects imported from the Scope of Registration file and whether they are new or already exist in the system.
Select whether to import new Programs and Subjects and whether to Update existing, as well as Program – Subject Links and click Import Scope.
Once completed, click OK to save the changes or Cancel to discard.
To modify existing Program Scope details, or create New Program Scope Details Manually, select New or Modify from the Program Scope Search Form.
If these details have not been loaded from a Scope of Registration provided by your Authority, it is essential to ensure the Code, Name, Hours and Lookup values match what is expected in validation.

Go to the Subjects Tab to set-up Subjects linked to this Program Scope, as well as specify Compulsory Subjects that each Program under this Scope will be linked to by default. If you have loaded the Scope using the Importer, Subjects should be linked here automatically, and only compulsory Subjects will need to be selected.

Contracts
Setup Contracts in eBECAS to define the different Funding methods VET training will be provided under. This includes Government Funding such as User Choice as well as Student Funded such as Fee For Service.
As well as setting up the Contract Number to be reported in Avetmiss, a Funding Pattern can also be setup as part of the Contract. This will define the value for Avetmiss Funding Codes used when enrolling under this Contract and assist in auto-completing much of the detail for individual student results.

Enter a Name for Display purposes and an AVETMISS Code (which will be reported under any Avetmiss Reports for this Contract). If the Contract is Government Funded, check the relevant box and enter Start and End dates for the Government Funded Contract.
A Funding Pattern can also be set-up. This will be used to fill in default values for a number of Avetmiss fields (such as the Funding Type, State Funding etc.) for Results under Enrolments using this contract.
Programs Details
Once the Subjects, Scope and Contracts are setup, setup Training Programs for the actual training to be offered by the organisation.
Enable Avetmiss by selecting VET as the Course Type. Select the Program Scope applicable for this Program. eBECAS will ask whether all Subjects linked to his Scope should be linked to the new Program, or only Compulsory Subjects.
The Contract can also be selected for the Program, which will be set for all enrollments under this Program.

Optionally, for each Subject attached to the Program a different Delivery Location can be selected (from the list of assigned Delivery Locations for the Program Faculty). Select any modified Delivery Locations and click Save Subjects.
Student Details
For students that use Avetmiss, please display the Student Details and you will find a VET & HE tab where you can enter the Student’s details for Avetmiss.
Entering VET Results Individually
VET Results can be marked-up using either the Results form from Enrol Details
If a Funding Pattern and Contract have been set-up, most of the Avetmiss Details for a Result should be pre-filled, only the VET Outcome and Start and End Dates will need completion for submission. The Purchase Contract, Schedule, Delivery Location and Delivery Mode are all optional at this level and will use values already completed in the Enrollment if left blank for the Result.

Entering VET Results In Bulk
By using the VET & HE Results option, VET results can be viewed and entered in bulk. This is available from the Enrolments section of the Main menu.
From this form, search for Results that match the Criteria entered (by Student Name or Number, Course, Subject, Faculty etc.).
The Search Grid will show Results matching these criteria. As with other eBECAS Search Grids this can customised this to suit specific needs; grouping by Field, Filtering results and adding / removing fields using the Field Chooser. Right Click on the Grid Header to access this functionality.
Double Click a row to view the Result Detail Form; also view the Enrolment, Student, etc. from the View menu to the left.
Below is an example VET Results form with a search returned (with some example grouping and layout set-up).
Certain fields can be directly edited. The Result Status, Start and End Date, VET Outcome, Delivery and Funding, Actual Hours and Client Fees can all be edited (along with some WA specific fields).
A modified row will be indicated by a check in the Modified column (found to the far left of a row) until editing has been saved or cancelled.
To Save or Cancel updates, Use the Apply Changes and Cancel Updates actions in the Save Section of the Toolbar. Note that any changes will not be saved until this has been done. The system will warn you if you try to close the form or begin a new Search when changes have not been saved (or Cancelled).
The Merge section of the Toolbar will allow multiple rows to be selected to perform a number of operations. When the Merge section is opened a Merge Check box will be shown to the left of each row. Once required rows are selected, there are a number of operations to merge the selected data using Word, etc. (similar to Merge Functionality in the VET & HE Enrolments Form).
There is also a Bulk Edit function which allows all results selected to be updated. It should be noted that as this is a powerful option, it should be used with extreme caution as it can perform large updates on large amounts of your data.
When selected, the VET Results Bulk Edit Screen is shown.

This gives the option to select Result information to be updated. Leave any field blank to make no changes to that field. Click OK to make the changes and the Results Grid will be updates according to the selections made. Note the option to cancel these changes is still available and changes will need to be saved before the update is completed. It is recommended to thoroughly review any changes made using the Bulk Edit function before applying the changes.
Avetmiss Reporting
Go to Utilities->Avetmiss->Avetmiss Reports to generate an Avetmiss Submission of your enrolment data.
Enter a Year and Collection Period. You can also Filter Enrolments by Location, Faculty or Contract to limit what you want to report.
Locate a directory for your Submission to be Saved too and select the State the Submission is for (this will determine the formatting of files). For submission to NCVER, select National (NCVER) as the State Option.

The Report can be exported as a NAT Files for Submission. The export can also be generated as CSV files which are not for Submission but can be usefull to open in excel (with Column Headings) for validation and checking.
